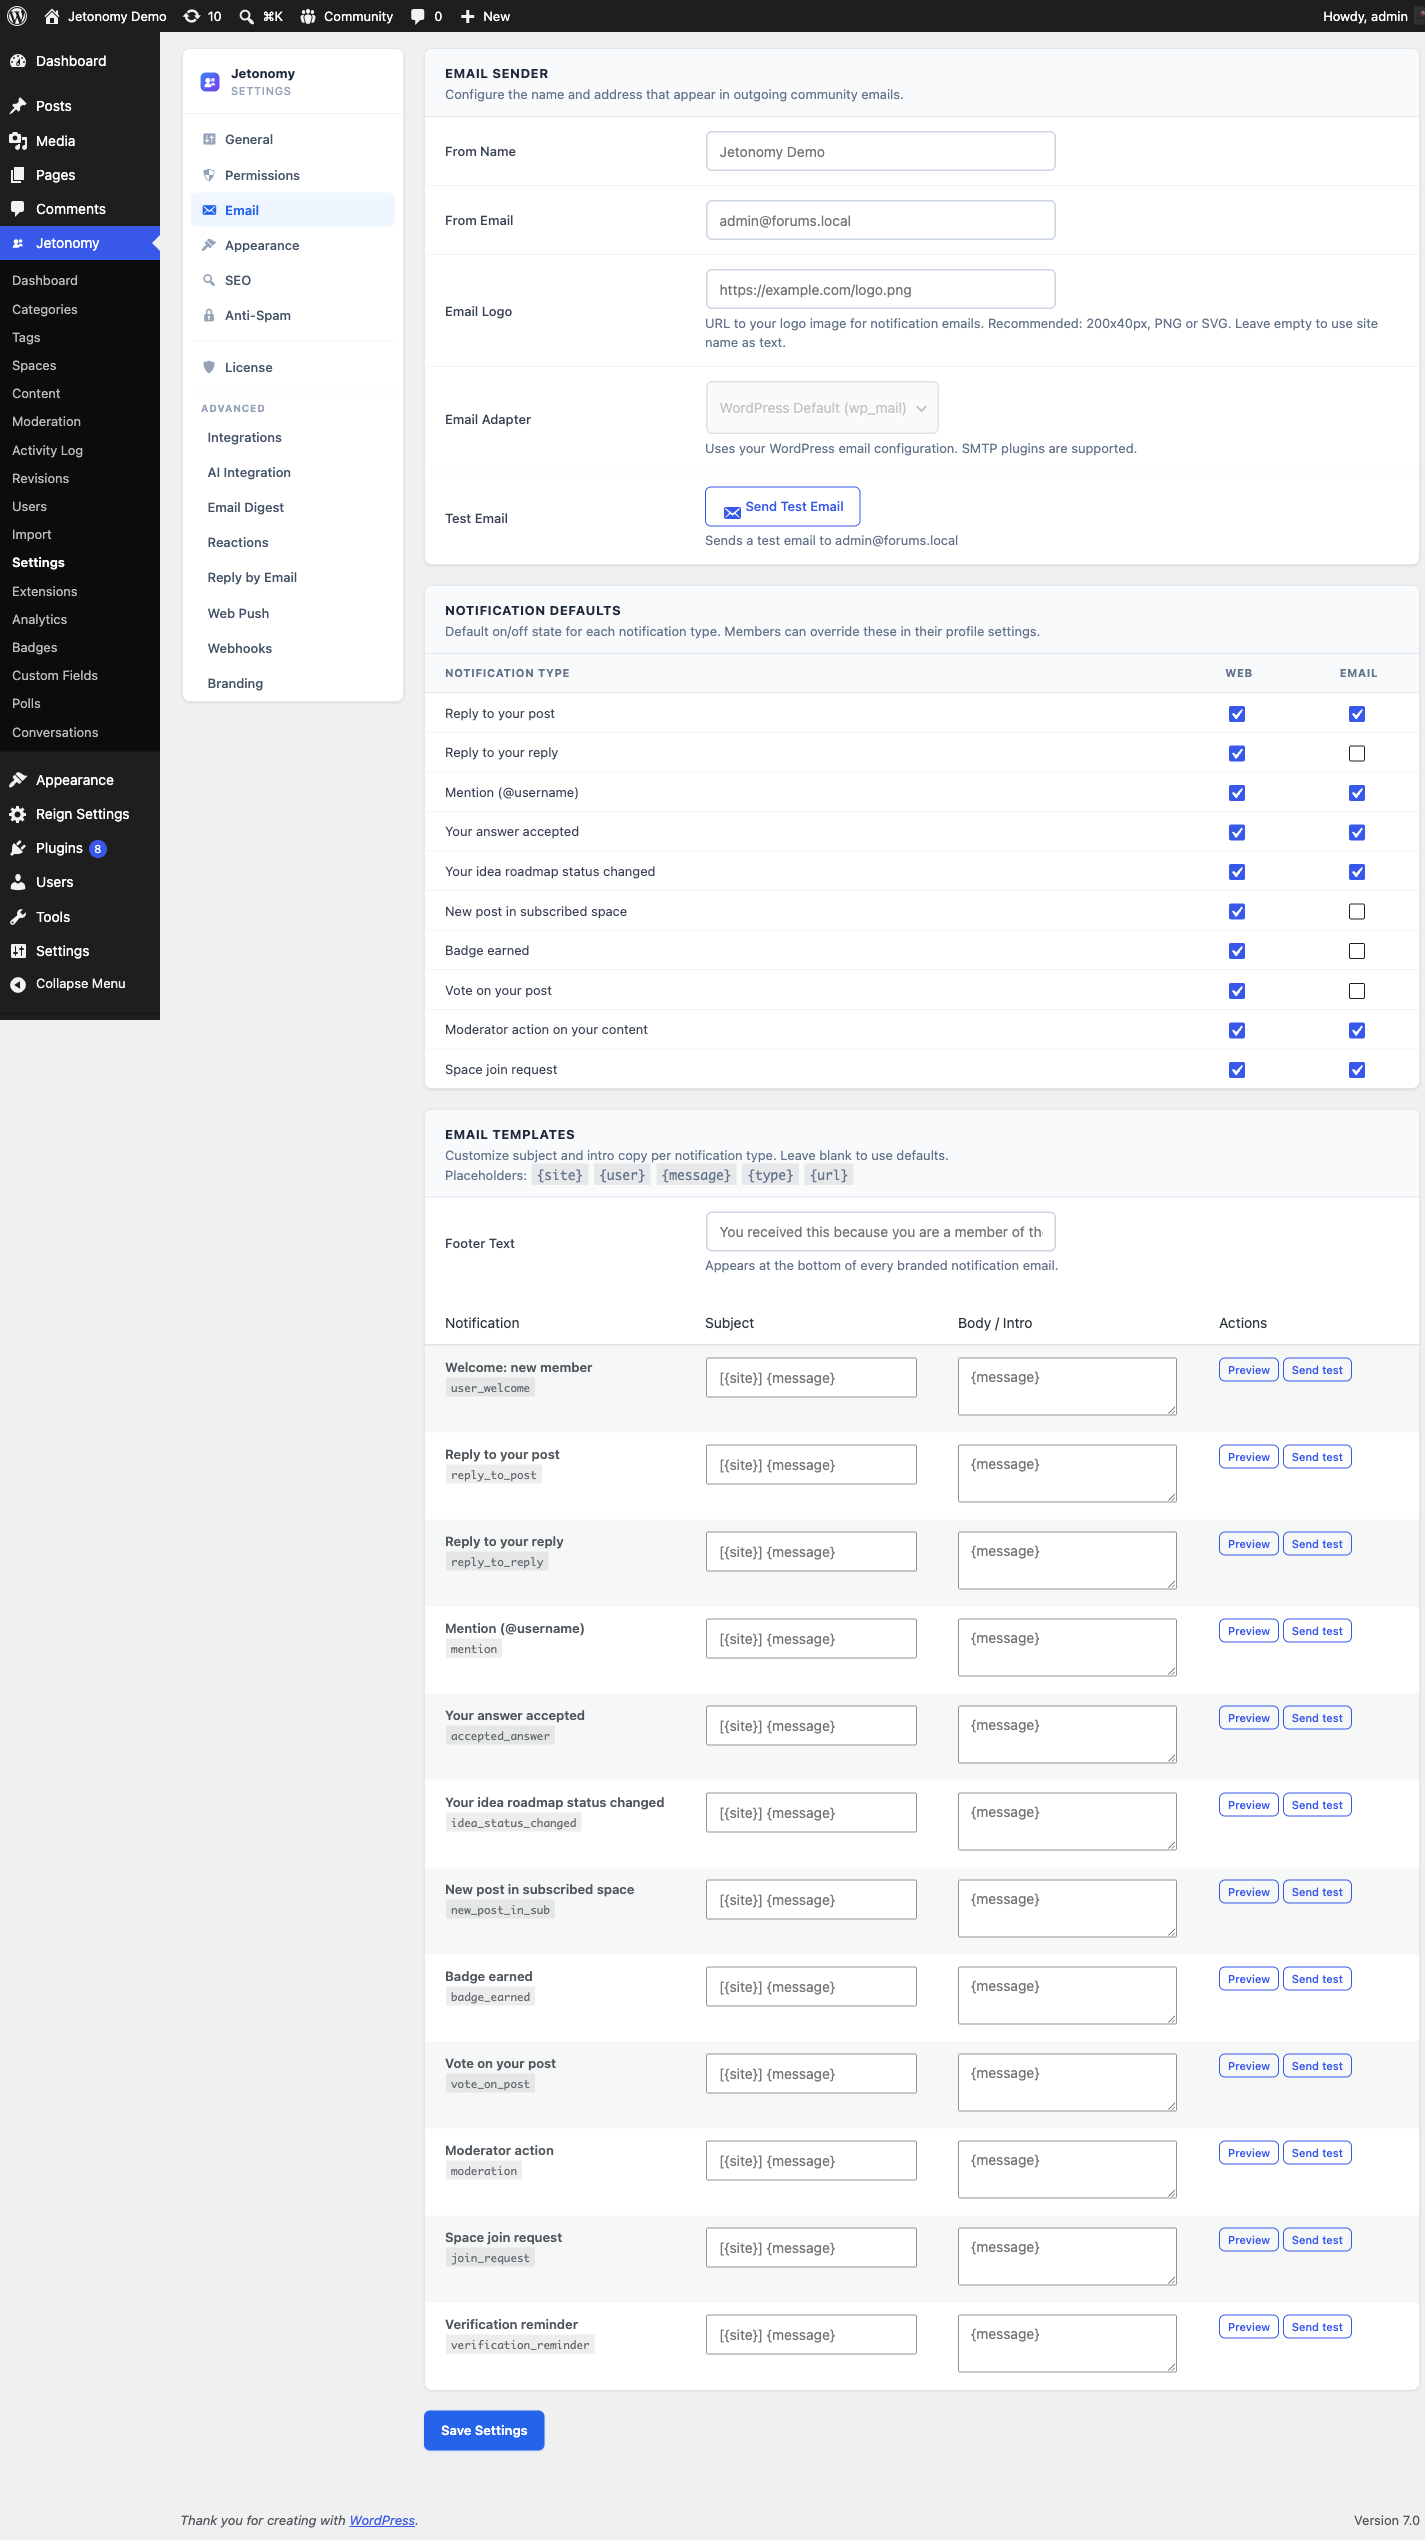
Email Settings
Email notifications bring members back to your community even when they are not actively browsing. Jetonomy sends a notification email for every in-app event type, and both you and your members have control over which emails are delivered.
What You Will Learn
- Which notification types send email
- How to configure default email settings for new members
- How members control their own email preferences
- How one-click unsubscribe links work
- How Jetonomy sends email and how to use your own SMTP provider
- What email digest options are available in Jetonomy Pro
Which Notification Types Send Email
Every notification type that appears in the in-app bell can also send an email. The email mirrors the in-app notification - it names the event, shows a short excerpt of the content, and includes a direct link back to the relevant topic or reply.
Jetonomy ships with ten notification types. Each one sends email by default, or not, as shown below:
| Notification type | Email sent by default |
|---|---|
| Reply to your topic | Yes |
| Reply to your reply | No |
| @mention | Yes |
| Answer accepted (Q&A) | Yes |
| Idea roadmap status changed | Yes |
| New post in followed space | No |
| Badge earned (Jetonomy Pro) | No |
| Vote on your post | No |
| Moderator action on your content | Yes |
| Space join request | Yes |
The defaults above are what Jetonomy applies when a new member signs up. Administrators set these site-wide defaults in Jetonomy → Settings → Email; the full settings reference, including the matching web (in-app) defaults, lives in Email Settings. Each member can then override any type for themselves (see "How Members Control Their Preferences" below).
Tip: "New post in followed space", vote, and badge emails are off by default because they can occur frequently. A member who follows many active spaces would otherwise receive a high volume of email. Let members opt in rather than having to opt out.
Editable Email Templates (updated in 1.4.1)
Every notification email Jetonomy sends has an editable template - subject and body - at Jetonomy → Settings → Email → Templates. Change the wording to match your community's voice without writing any code.
Two improvements landed in 1.4.1 that are worth knowing about:
- Reset to default button on every template - one click restores the shipped subject and body. No more retyping if you change your mind or want to start over.
- Verification reminder template is now editable from the same screen. The reminder fires once per member, a configurable number of hours after sign-up (default 24), if they haven't clicked the verification link in their welcome email. Set the delay in
jetonomy_settings.verification_reminder_hours, or set it to0to disable the reminder entirely. See the verification reminder section for the full behaviour.
Defaults now have a single source of truth so reset always restores the exact copy the plugin ships with - even if a future update changes the default wording, your reset still gets the version you'd see on a fresh install.
Template Placeholders
You can use these placeholders in any subject or body. They are replaced with the real values when the email is sent:
| Placeholder | Replaced with |
|---|---|
{site} |
Your site name |
{user} |
The recipient's display name |
{message} |
The notification summary text |
{type} |
The notification type key |
{url} |
A direct link to the relevant content |
{post_title} |
The title of the related topic or idea |
{actor_display_name} |
The member who triggered the notification |
{reply_excerpt} |
A short excerpt of the reply |
{space_title} |
The space the activity happened in |
Any placeholder with no value for a given event renders as an empty string, so it never shows up as literal {post_title} text in the email.
Configuring Default Settings
The community-wide defaults - which types email by default, the From name, the From address, email branding, and the editable templates - all live on the admin Jetonomy → Settings → Email screen. That screen is documented in full, with every setting key, default, and location, in Email Settings.
Changes to defaults apply only to new members who sign up after the change. Existing members keep their current preferences.
How Members Control Their Preferences
Each member can override the defaults from their profile settings at /community/u/their-username/edit/ under the Notifications tab. Every notification type has a separate toggle for in-app and email delivery.
Members can disable all notification emails at once with the Pause all email toggle. This is the equivalent of a temporary snooze - all preferences are preserved so they can turn email back on later.
One-Click Unsubscribe
Every notification email sent by Jetonomy includes an unsubscribe link in the footer. Clicking it immediately unsubscribes the member from that one notification type and shows a confirmation message.
No login is required to unsubscribe - the link contains a signed token that authenticates the action. This keeps unsubscribe rates low and means members who receive an email do not need to remember their password to opt out.
How Jetonomy Sends Email
Jetonomy uses WordPress's wp_mail() function to send all notification emails. This means it automatically works with any SMTP plugin you have installed - WP Mail SMTP, FluentSMTP, Postmark, Mailgun, or any other wp_mail compatible provider.
No additional configuration is needed in Jetonomy when you add an SMTP plugin - it just works.
Note: If you send high volumes of notification email, use a dedicated transactional email provider (Postmark, Mailgun, Sendgrid) rather than your hosting server's mail. Dedicated providers give you delivery tracking, bounce handling, and higher sending limits.
Email Digest (Jetonomy Pro)
PRO - This feature requires Jetonomy Pro.
The Email Digest feature bundles all notifications from a configurable time window into a single summary email. Members can choose daily or weekly digests instead of receiving individual emails for each event. This dramatically reduces email volume for active community members while keeping them informed.
What's Next?
Learn how member profiles work, what stats are displayed, and how members can edit their own information.