General Settings
The General settings tab is the first place to go after installation. It controls your community URL, pagination defaults, and who can read or participate.
What You Will Learn
- How to change your community's base URL slug
- What the default space type setting controls
- How to set your community's display title
- How to configure pagination for posts and replies
- How the Public / Private access control works
Go to Jetonomy → Settings to access these options. All changes take effect on save.
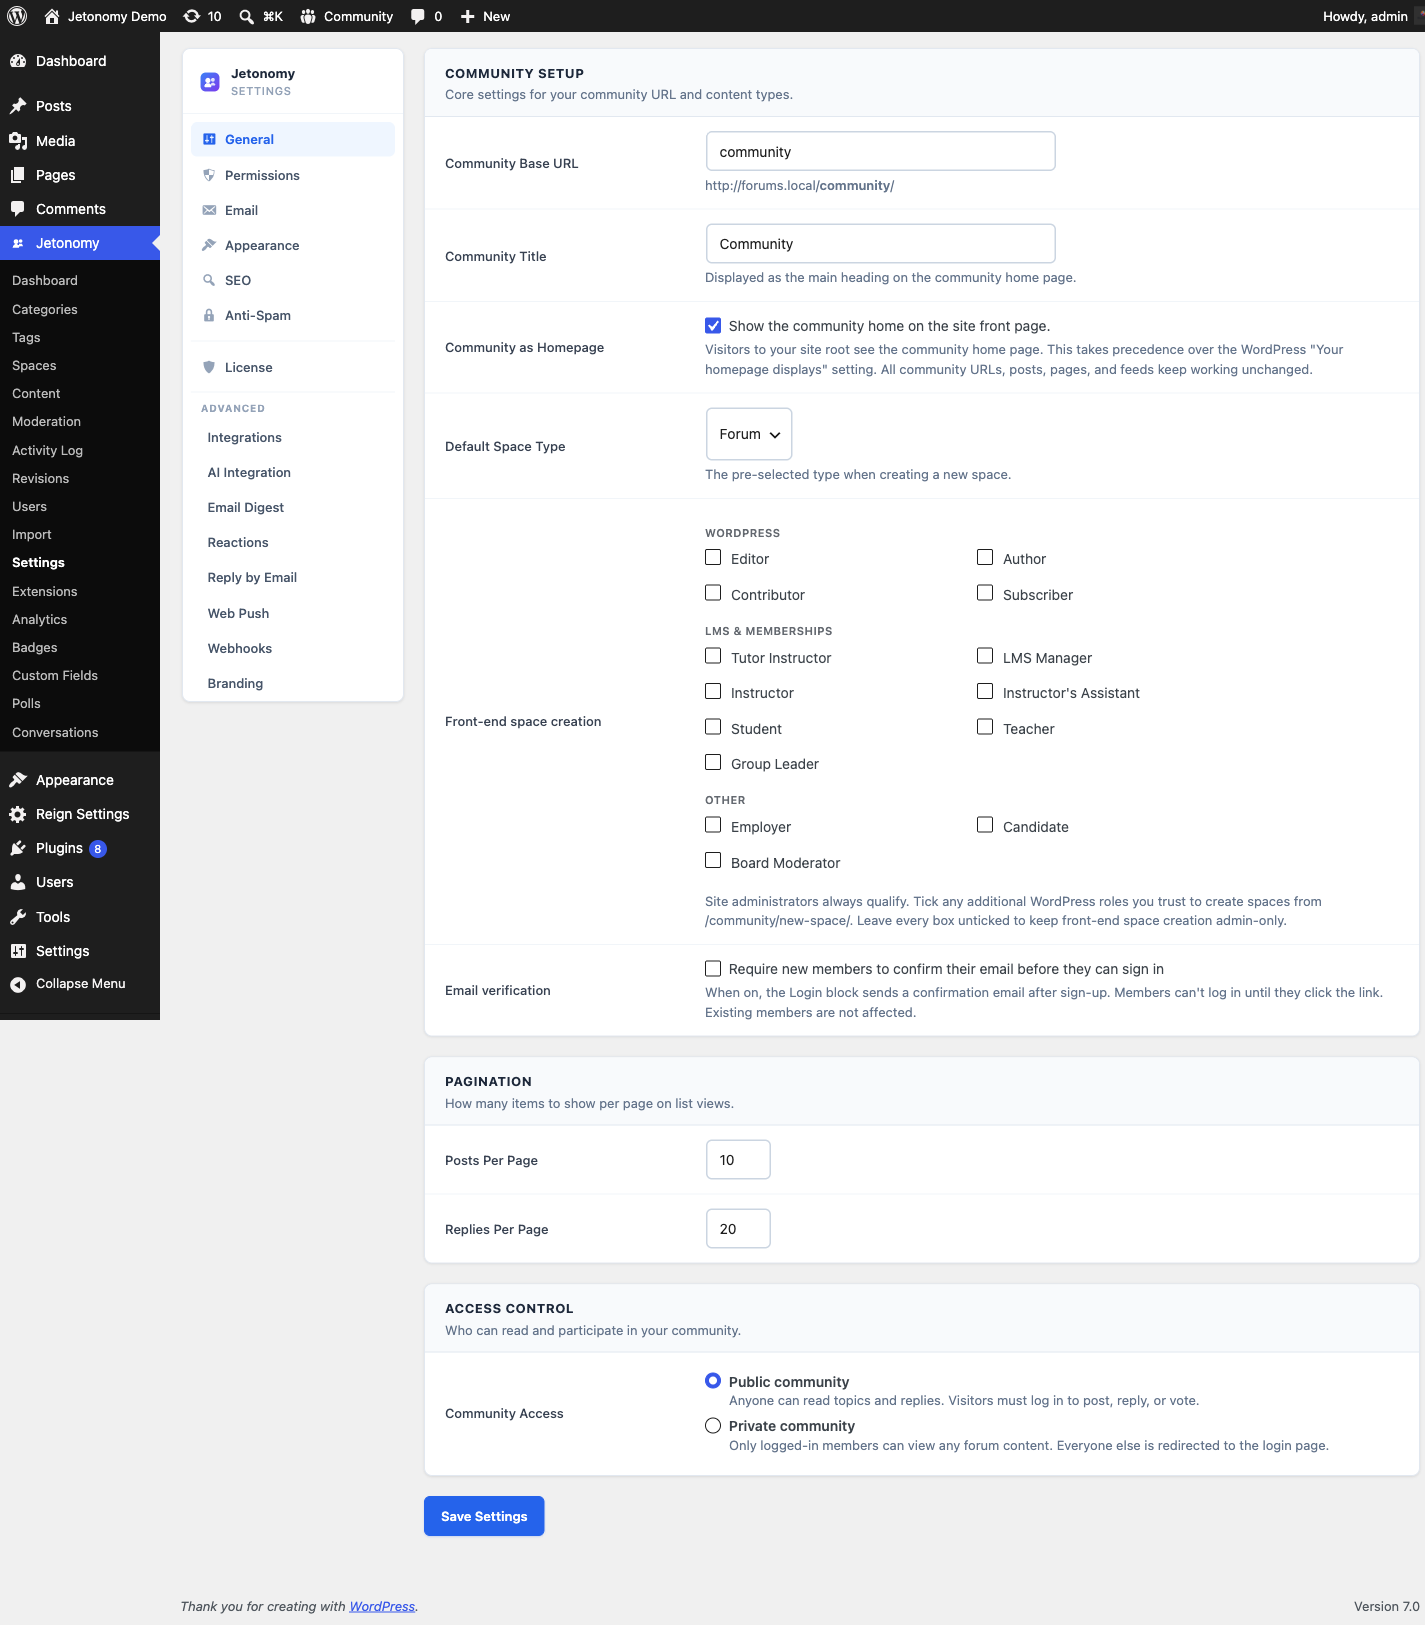
Community Base URL
Setting: base_slug
Default: community
Location: General tab → Community URL section
This is the URL prefix for all Jetonomy pages on your site. With the default value, your community home is at yoursite.com/community/. Spaces live at yoursite.com/community/s/space-name/, and so on.
You can change this to any URL-safe string, for example forum, hub, or discuss. Jetonomy automatically flushes rewrite rules when you change the base URL and save settings.
Warning: Changing the base URL after your community has content will break all existing links. If you must change it on a live site, set up 301 redirects from the old slug to the new one.
Community Title
Setting: community_title
Default: Community
Location: General tab → Community URL section
The display name of your community. It is shown as the main heading at the top of the community home page. Change it to your brand or community name (for example "Acme Support Forum" or "The Builders Hub"). This is a display label only - it does not change the base URL or any links.
Default Space Type
Setting: default_space_type
Default: forum
Options: Forum, Q&A, Ideas, Feed
When you create a new space in the admin, this setting pre-fills the Type dropdown. It is a convenience setting only - you can always change the type on any individual space. It does not affect existing spaces.
Choose the type that best matches the primary purpose of your community:
- Forum - open discussion, replies sorted by date
- Q&A - questions and answers, accepted answers float to top
- Ideas - feature requests and votes, status workflow
- Feed - short-form cards, optional title, chronological feed
Posts Per Page
Setting: posts_per_page
Default: 20
Location: General tab → Pagination section
Controls how many posts appear per page in space listings and search results. A lower number is faster on large communities; a higher number reduces clicks for users who prefer scrolling. This value also controls how many additional posts load each time a member clicks Load More on a space listing.
Tip: For communities with 10,000+ posts per space, keep this at 20 or lower. Higher values increase page load time and database query time proportionally.
Replies Per Page
Setting: replies_per_page
Default: 30
Location: General tab → Pagination section
Controls how many replies load per page inside a single post view. This value also controls how many additional replies load each time a member clicks Load More in a thread. Pagination starts at the oldest replies and works forward. Members can jump to the last page to see the most recent replies.
Guest Access (Public / Private)
Setting: guest_read
Default: Public (guest reading on)
Location: General tab → Access Control card
This is the single control that decides whether logged-out visitors can read your community. On the Access Control card it appears as two radio buttons - Public community and Private community - not a checkbox.
- Public community (default) - logged-out visitors can read all public spaces, posts, and member profiles. They see a prompt to log in when they try to vote, reply, or follow a space.
- Private community - every community page redirects guests to sign-in, and the REST API rejects unauthenticated requests. Choose this for members-only communities you do not want indexed by search engines.
Note: Even in Public mode, anonymous posting is not supported. "Public" means read-only browsing for logged-out visitors. Visitors must always log in to post, reply, or vote.
This Public/Private toggle is the same guest_read setting documented in full - including exactly which pages stay reachable in Private mode and how the REST API behaves - on the Access Control page.
Community as Homepage
Setting: front_page
Default: off
Location: General tab → Community Setup section
When enabled, visitors to your site root see the community home page instead of the WordPress front page. This takes precedence over the WordPress Settings → Reading → Your homepage displays setting. All community URLs, posts, pages, and feeds keep working unchanged.
Front-end Space Creation
Setting: frontend_space_creation_roles
Default: empty (admin-only)
Location: General tab → Community Setup section
Controls which WordPress roles may create spaces from the front end at /community/new-space/. Tick any roles you trust to create spaces. Site administrators always qualify regardless of the selection. Leave every box unticked to keep front-end space creation admin-only.
Require Email Verification
Setting: require_email_verification
Default: off
Location: General tab → Access section
When this is on, new members who register through Jetonomy's Login block receive a confirmation email immediately after sign-up. They cannot log in until they click the verification link in that email. Existing members are not affected - this setting applies only to accounts created after you enable it.
A follow-up reminder is sent automatically if the member has not confirmed within the configured window.
Setting: verification_reminder_hours
Default: 24
Location: Stored in jetonomy_settings['verification_reminder_hours']
This controls how many hours after registration the reminder email is sent. The reminder runs on an hourly WP-Cron schedule (hook: jetonomy_verification_reminder). The email template can be customized on the Settings → Email screen under the "Verification reminder" row.
Note: If you use a third-party registration flow (WooCommerce, Restrict Content Pro, LearnDash) instead of Jetonomy's Login block, those plugins handle their own email verification. This setting only applies to registrations that go through the Jetonomy Login block.
Rebuild Counters
Location: Dashboard → Quick Actions, or via WP-CLI / REST API
Jetonomy stores denormalized counters (reply counts per post, post counts per space, member counts per space, vote scores) for performance. These counters are updated in real time on every write, but they can drift from true values after bulk database edits, server failures, or plugin imports.
Use Rebuild Counters to recalculate all denormalized values from the canonical tables.
WP-CLI:
wp --path="/path/to/wordpress" jetonomy recount
wp --path="/path/to/wordpress" jetonomy recount --type=posts   # posts only
wp --path="/path/to/wordpress" jetonomy recount --type=spaces  # spaces only
wp --path="/path/to/wordpress" jetonomy recount --type=votes   # votes only
wp --path="/path/to/wordpress" jetonomy recount --type=users   # user profile counters only
REST API (site admin only):
POST /jetonomy/v1/admin/recount
{ "type": "all" }
Valid type values: all, posts, spaces, votes, users. Omit or pass all to rebuild everything. The response reports how many rows were updated per step. On a large community (100,000+ posts), a full recount may take 10-60 seconds - run it during low-traffic hours.
Tip: After running an import from bbPress, wpForo, or Asgaros, always run a full recount. The importers insert rows directly and skip the counter-update logic.
Admin Bar Shortcut
All logged-in members see a Community menu in the WordPress admin bar. This menu links to the community home, your notification inbox, and your profile.
Members who have the jetonomy_manage_spaces or manage_options capability also see an admin sub-section with direct links to: Manage Spaces, Add New Space, Categories, Moderation Queue, Posts and Replies, and Settings.
The admin bar menu appears on both the public site and inside wp-admin, so you can jump from any page in the dashboard directly into the community and back.
Settings Save Confirmations
After you click Save Changes, a confirmation banner appears at the top of the settings page. The banner stays visible until you dismiss it - it does not disappear automatically. This ensures you always have a clear signal that your changes were saved.
What's Next?
Configure trust level thresholds and rate limits to control who can do what in your community.
Related Pro Features
- White Label - replace Jetonomy branding with your own.
- Analytics - community health and engagement dashboard.
- Webhooks - send community events to external services.